
Home private network
How to build a simple but good home network with multiple VLANs
This guide is aimed to assist anyone wanting to setup a more secure and more robust home network so you can avoid just connecting to you ISP's provided modem/router. You will also be able to segregate your network in multiple VLANs, allowing you to separate your personal devices from your servers and in the end give you more control over everything.
We will aim this guide at some specific devices and softwares, but you can adapt where needed. Please reach out if you run into problems.
Table of Contents
- 1 - Requirements
- 2 - Pfsense appliance options for your house
- 3 - Preparing pfsense
- 4 - Pfsense setup
- 5 - Pfsense VLAN setup
- 6 - Pfsense easy to miss details
- 7 - Smart Switch VLAN tagging setup
- 8 - How to troubleshoot some problems
- 9 - Wifi AP
- 10 - Restrictive rules
- 11 - Suricata IDS/IPS
- 12 - Further improvements
1 - Requirements
- Some familiarity with Linux, running Linux commands, ssh and other introductory Linux concepts
- Some familiarity with networking, and its components (You will learn a bunch here as well).
- Some familiarity with Linux networking (You will learn a bunch here as well).
- Your Personal Machine
- It can be a Windows or a Linux machine. Preferable if it is a Linux machine since during the guide I will show inputs and outputs from a Linux machine. The distribution doesn't matter.
- This machine needs to have a ethernet socket (CAT 6/CAT 4 - simple internet cable thingy). If your laptop does not have it, you can buy an ethernet to USB adapter.
- A VLAN aware router/firewall. More specifically for our examples, a hardware appliance were we can install Pfsense.
- A VLAN aware switch (smart switch).
- At least 6 ethernet cables, of various lengths, depending of how you mount everything.
- A Wifi Access Point.
- Your ISP modem/router (We can maybe get rid of it, we will talk about that).
Being a bit more specific about the hardware that we will be using as an example:
- For the Pfsense compatible appliance, you can use any Netgate routers, Protectli Vault routers or similar. For this example we will be using a Protectli Vault 6, which can be a bit expensive, but you can follow same steps with Netgate cheaper hardware.
- We will be using a TP-Link TL-SG108E smart switch. You can use any smart switch capable of dealing with 802.1Q VLANs.
- For the wifi Access point, you can use any available. I will be just showing the simple steps with the Unifi Nanohd from Ubiquiti.
2 - Pfsense appliance options for your house
First option Protectli Vault
This is the option that I am using for this demo. It is very powerful, and you can easily change/replace components on it like in a laptop or PC. Some versions of it come without storage or RAM, and you are expected to install those yourself. Protectli Vault 6 comes with 6 ports, intel i series processors, and you are supposed to install a mSATA SSD and RAM on it. You can go up to 64 GB of RAM with 2 DDR4 16GB RAM units. You can also put less than that. This is a router that, in all reality, you can use as a PC, if you for some reason need that. It has HDMI output and multiple USBs sockets.
Link: https://eu.protectli.com/products/
Netgate
The advantage of going with Netgate and using Pfsense is the fact that they are the company helping maintain the community and enterprise edition of the software. They have really interesting options for appliances, some even allowing you to just put your fiber cable directly on the router and completely throw away your ISP's modem (Not all ISPs would be happy with that, by the way - in Brazil they even artificially jam your signal if you do that). The other advantage of going with Netgate is that they provide some very interesting cheap options, like the Netgate 1100, for $189. They even provide hardware that already comes with Pfsense installed, which would make you skip some steps in this guide.
Link for the products that already come with Pfsense: https://www.netgate.com/pfsense-plus-software/how-to-buy#appliances
Other options
Simply search for Pfsense on any e-commerce website, and you will get back some other options that will let you install Pfsense on them. It is as simple as that, and you can decide based on what you plan to do at your home. If you don't have heavy load planned, maybe going for something less powerful could be interesting to you.
3 - Preparing pfsense
If you have one of the hardware appliances that comes clean, with no operating system, the first thing we have to do is install Pfsense on it.
Downloading Pfsense
Let's go to the official download page and fill the form according to our preference. For Protectli Vault, since we have HDMI output, you would fill this fields as:
- Version: choose the latest
- Architecture: AMD64
- Installer: USB Memstick Installer
- Console: VGA
- Mirror: Anything that is closer to you for faster download
Creating bootable USB Stick
If you are on Windows, you can use Rufus for writing the image to the stick. If you are on Linux/Mac, you can use anything that you want, like dd, or something like balenaetcher. Simply write that image file that you downloaded to the USB stick that you want to use as bootable device.
Installing Pfsense to the Appliance
For Protectli Vault, you can now plug a keyboard and the USB stick to any of its USB ports. Turn it on while being plugged to the power socket. If it beeps 4 times (initial turn on beep and 3 different beeps) and gives you no video output, you probably forgot to install an SSD and RAM memory units (Or you did not realize that this appliance comes without them 😅).
For installation steps, you can go simple with:
- Accept copyright notice
- Install
- Default Keymap
- Auto ZFS
- Install
- Stripe
- Then choose the appliance SSD from the list (select with space bar, enter to continue)
- Last chance warning, just accept it
It should be finished pretty quickly.
Booting it up
Unplug your keyboard and USB stick, and reboot the device. It will boot up and sing for you. It will print its IP to the HDMI output monitor, and now you can use it to login to it.

Plugin it in
Plug the internet cable, coming from your modem in the WAN port of the appliance, and plug the LAN port to you laptop. If you did not configure your ISP's modem to stay in bridge modem, it will just assign a private IP to your Pfsense router. If you managed to do that before, your Pfsense will get a public IP assigned by your ISP. For some modems you need to leave ISP account details wrong on purpose, or similar strategies, while also enabling PPPoE passthrough. Then you would have to configure PPPoE credentials on your Pfsense.
You can completely ignore above paragraph if you just want to let Pfsense get a private IP and if you don't mind configuring port forwarding on both your modem and router.
4 - Pfsense setup
Let's type that ip address that we took note before in our web browser and access Pfsense admin console. Accept the insecure notice, since the connection is not behind ssl (which you can fix, but won't be covered here), and login with default credentials for now:
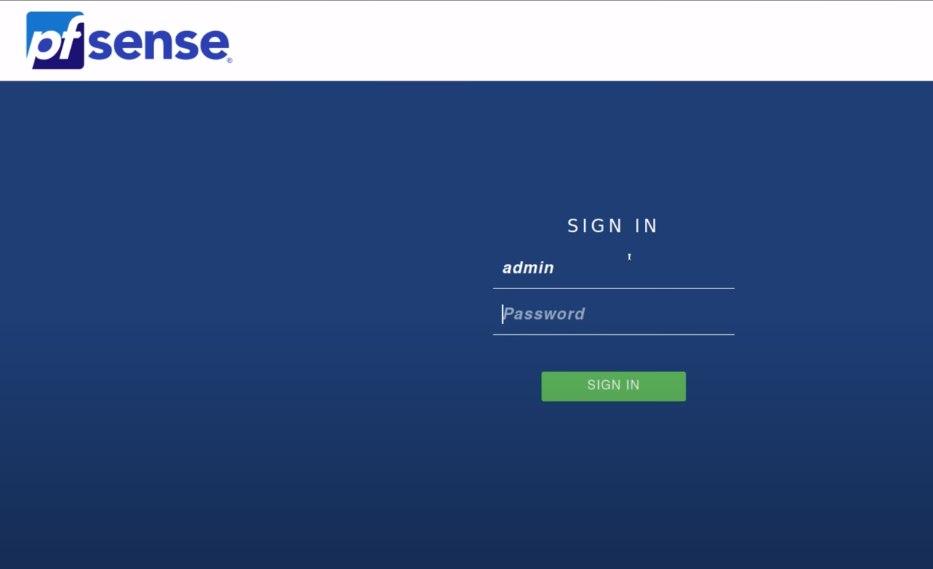
- Usename: admin
- Pass: pfsense
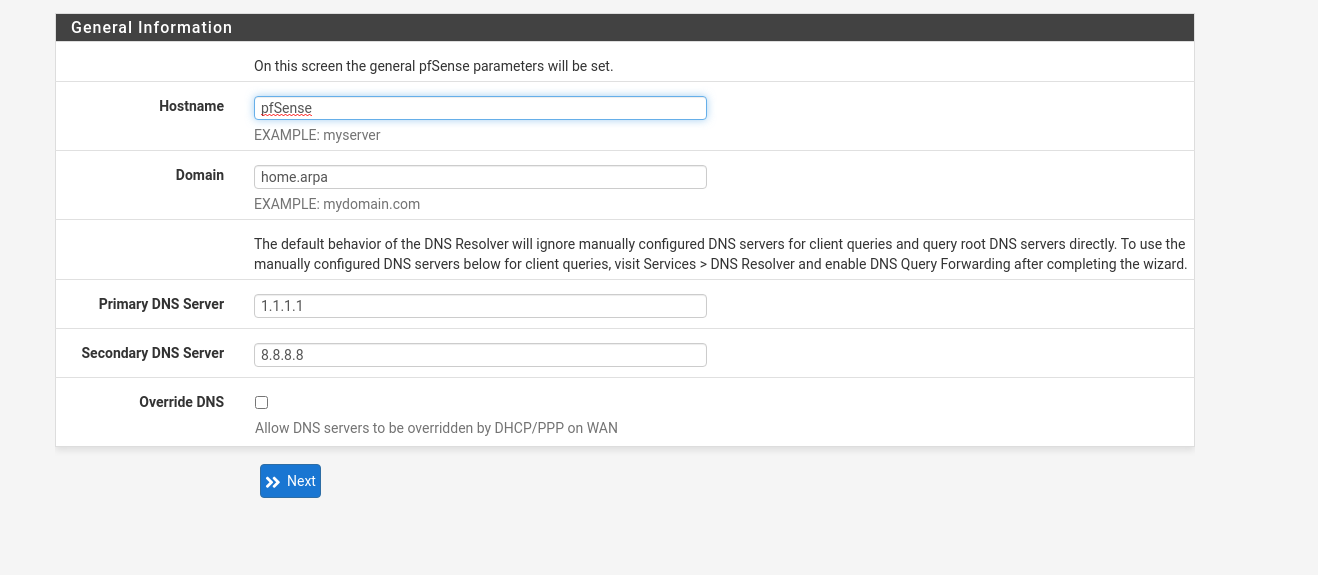
Go over the wizard configuration. Click next on the welcome notice. Click next on the Netfate support notice. Use any hostname that you want. Set DNS servers that you like, maybe 1.1.1.1 for primary and 8.8.8.8 for secondary. Uncheck override DNS. Click next.
At the WAN configuration, if you managed to put your modem in bridge passthrough mode, you will need to fill credentials here (not covering this, since this can vary a lot). If not, leave everything as is, and uncheck block private networks from entering via WAN, since your modem will give your Pfsense a private IP. Keep the block bogon option checked.
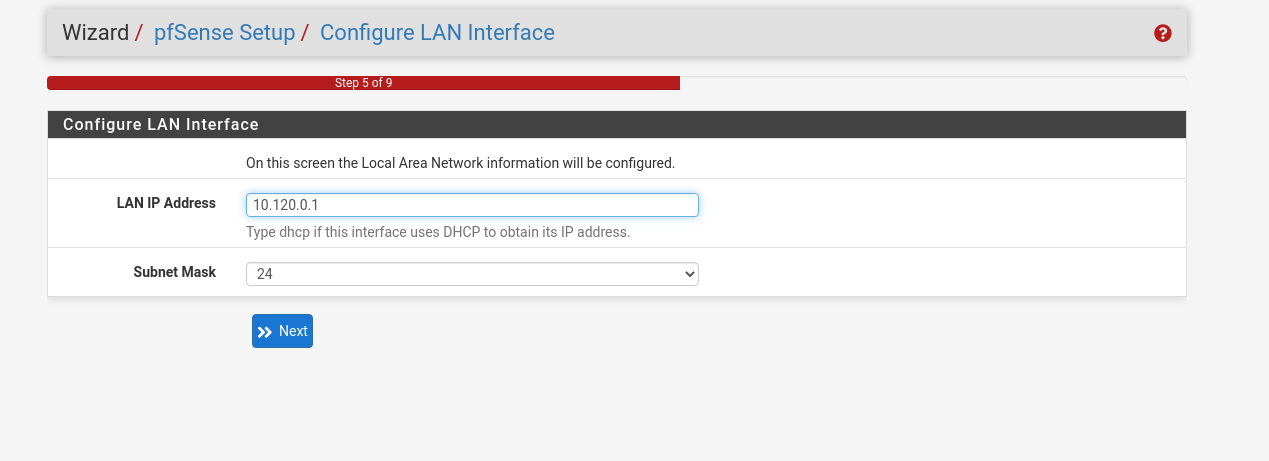
At the LAN configuration, set a new IP for your Pfsense, something less usual than what it comes with, maybe 10.120.0.1, or any other private range that you like.
At the password config, set a new strong password, ideally randomly generated by a password manager.
Review your changes and hit finish. If the browser takes too long to reboot, you can reboot the device yourself.
Now we need to access Pfsense on 10.120.0.1, instead of the IP that we used before.
5 - Pfsense VLAN setup
Before we start talking about VLANS I want to sit down a bit and talk about the simple network topology that we want to create in our home. Looking at it you can adapt to anything that makes sense to you, but this one is the generic "Servers and Personal stuff don't mix up" design.
So this is what we are trying to do:
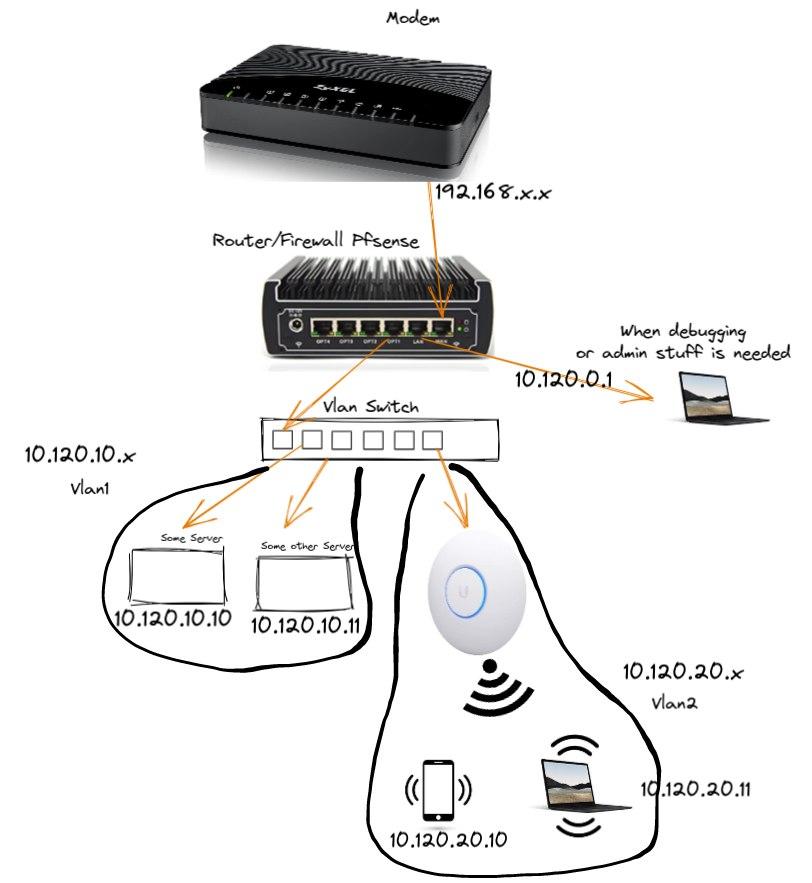
Very simple, modem to firewall/router, then to smart switch, and then separating into 2 VLANs. VLAN 1 (or more semantically, VLAN 10, so we start thinking about those VLAN IDs and IP ranges) will host our servers, where we plan to run web services or anything that is not personal. And VLAN 20 hosts our WIFI Access Point, which provides internet and connectivity to our personal devices. If an attacker manages to take hold of your personal devices, you are making it a bit more difficult for them to attack your servers (pretty hard). Same thing if the attacker takes hold of your servers, they would not easily jump to your personal devices, and you are reducing the blast radios.
Let's get right to it then.
Setting VLANs up in Pfsense
Go to "Interfaces" > "Assignments", in the admin console. Click the VLAN tab. Click the Add button.
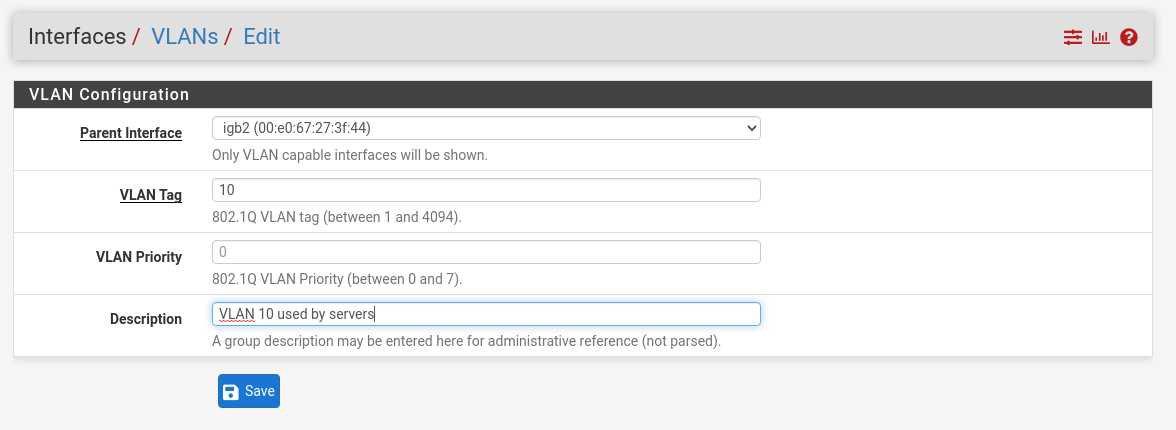
Create a new VLAN that you want to use the port igb2 (WAN is igb0, LAN is igb1). We want another port (igb2), that is not the LAN port, since in the LAN port we want to leave the admin console available, but that is not true for anything else. We assigned the VLAN tag 10 here, and this is what our smart switch will later use to know what is owned by one VLAN of the other. Click Save.

Do the same for your VLAN 20, write descriptions that make sense to you.
Assign the VLANs to interfaces

Navigate to "Interfaces" > "Assignments", in the admin console. Click the "Interface Assignments" tab. Click the last dropdown, next to the Add button. Select the "VLAN 10 on igb2" option. Click Add. Do the same for VLAN 20.
Congrats, you have VLANs configured, but we still need to enable them, let them do dhcp, and set firewall rules for them.
Enabling and configuring VLANs
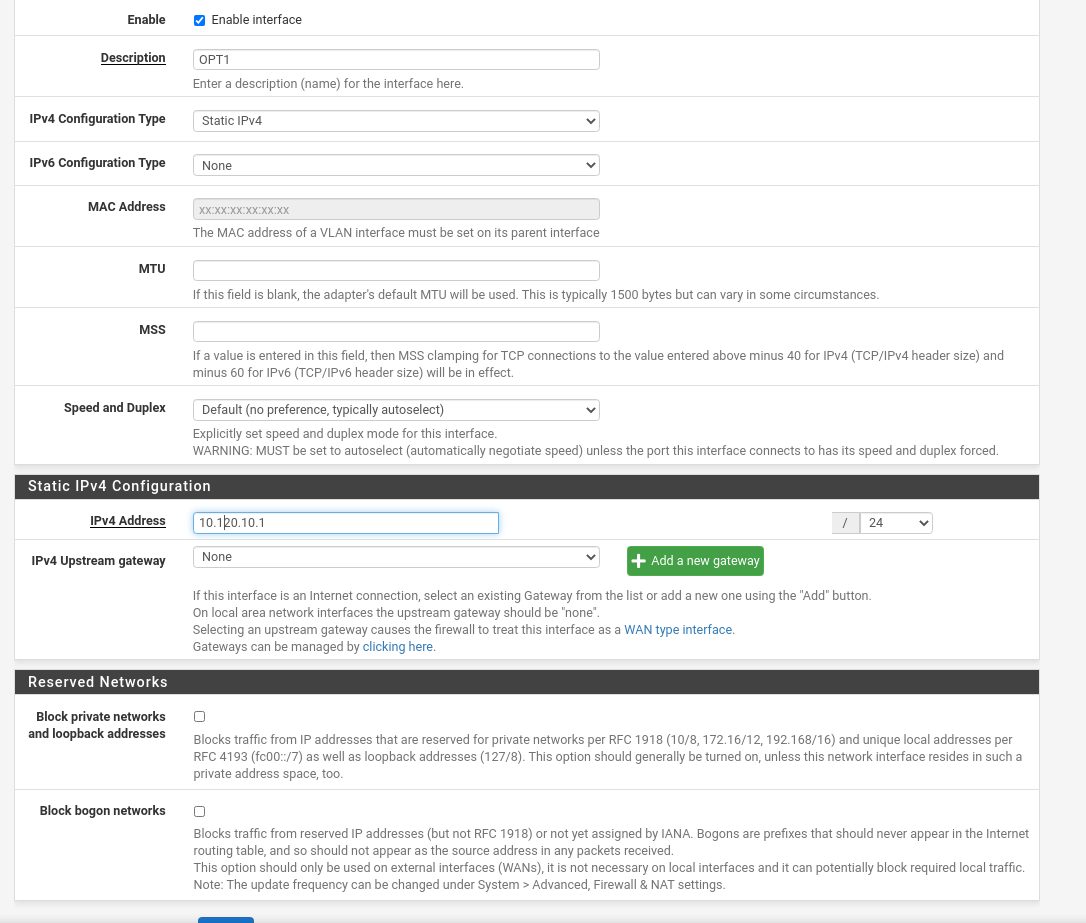
Navigate to "Interfaces" > "Assignments", and click OPT1 interface. Let's enable it and assign a static ip to it. ☝️
Do the same for OPT2. ☝️
If the static ip was configured correctly, it should now show up in the DHCP server pages. Please make sure you let it be static, and that you let the mask be /24.
Enabling DHCP

You can only enable DHCP if the interface is enabled, if it has a static ip with /24 mask, and if it is not blocking private ips coming from WAN. Navigate to "Services" > "DHCP Server", and you should see all interfaces matching this criteria as tabs at the top of the configuration page.
Enable DHCP and choose a reasonable range for each of the OPT interfaces.
Firewall for the new interfaces
Navigate to "Firewall" > "Rules". Have a look over the LAN interface rules. The first one simply lets us access the web admin console, and PFsense does not allow us to delete this rule, so we don't lock ourselves out of it. In any case, rules on top have priority, so if you block everything on top of that rule, you are locked out anyway.
The second and third rules allow IPV4 and IPV6 coming from the LAN subnet, for any protocol (important ones maybe being UDP and TCP here, since we need to reach UDP 53 for DNS, all your "normal" traffic will likely be on TCP).
If you have a look over OPT1 and OPT2, they don't have any rules. Which for Pfsense means block everything. We need to allow some traffic here.

For testing initially just go ahead and create rules that allow all traffic inside the VLAN. And do the same for OPT2.
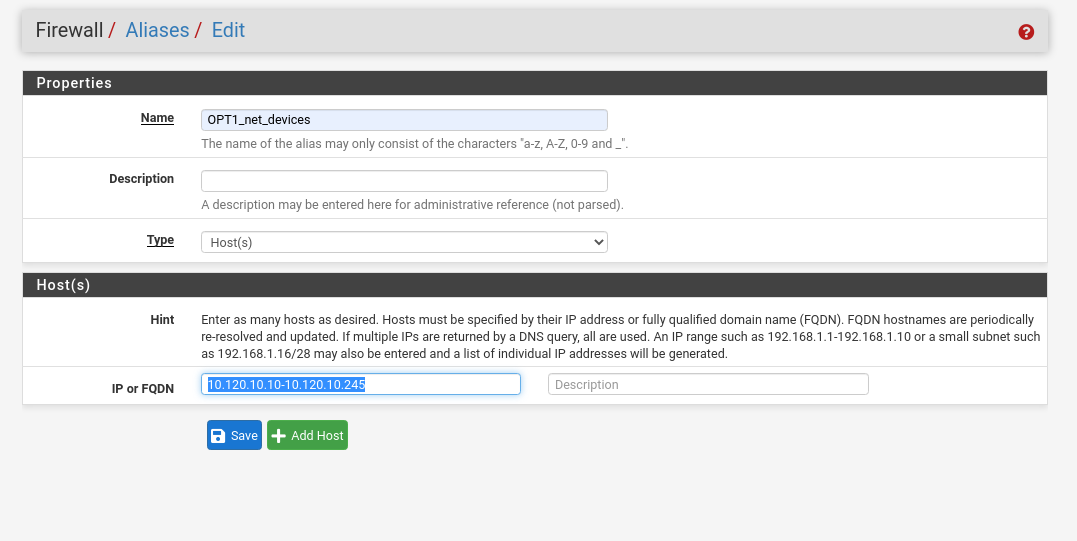
You can also create an IP alias for each of the IP ranges that you have (not including gateways) to already explicitly block traffic between those ranges. Navigate to "Firewall" > "Aliases", and create a new one using the range that you configured in the DHCP server.
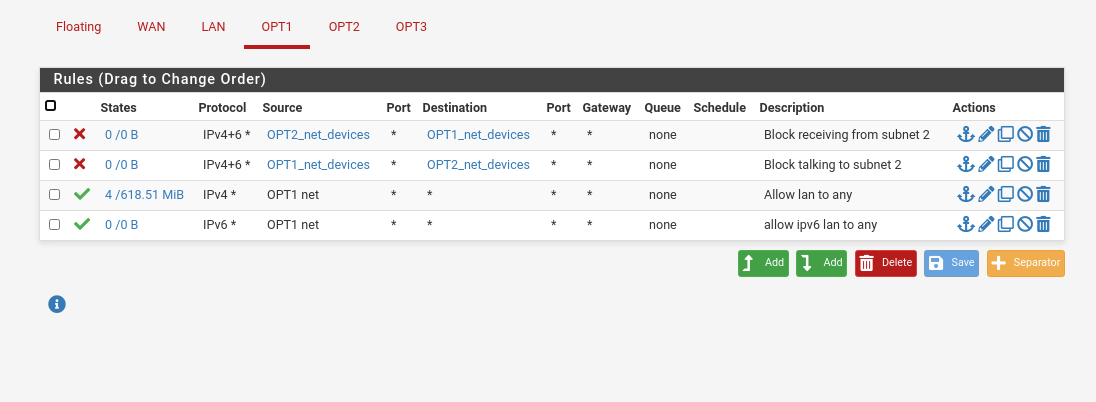
Then block those ranges from talking on both interfaces (or make a floating rule).
6 - Pfsense easy to miss details
I want to list here some things to re-check in the previous steps.
- Be sure that you include UDP in those Firewall rules, since machines need to reach port 53 UDP to resolve DNS
- In those print screens I am setting protocol to "any" for the sake of simplicity. You of course will need to come back later and start restricting your network more and more
- If you cant configure DHCP, you probably missed one of these things:
- You need to enable the interface
- You need to assign it a Static IP
- You need to set the /24 mask
- You can block bogon traffic, but cant block private traffic coming from WAN
7 - Smart Switch VLAN tagging setup
Let's now start to configure our switch. You probably want to read its manual to know how to access its admin console and how to setup VLANs. For this example we are going to go through how to setup these 2 VLANs (10 and 20) for TP-Link TL-SG108E smart switch.
Choosing Ports

Before starting, we need to decide which ports will be assigned to which VLANs in our segregated network. To make it visually simple, we can think of port 1 being the trunk port, coming from the router, ports 2-4 being the VLAN 10, and ports 5-8 being VLAN 20.
Setting up the switch
Don't connect your switch to the router yet. Let's use it in the standalone mode to make it easy to reach it for sure.

First edit your connections, and make the wired connection on your laptop have a static ip in the 192.168.0.x range. Plug the switch to a power socket and connect your laptop to port 1 of the switch. Access the switch in the 192.168.0.1 in a browser (this will be different for different switches).
Login with default credentials (admin:admin), and change your password to something secure, ideally randomly generated by a password manager.

Navigate to "VLAN" > "802.1Q VLAN", and enable "802.1Q VLAN" and apply. Type "10" in the VLAN ID (1-4094) field, and type "servers" in the VLAN Name field. Select Port 1 as tagged, and Ports 2-4 as Untagged. Hit apply.
Type "20" in the VLAN ID (1-4094) field, and type "personal" in the VLAN Name field. Select Port 1 as tagged, and Ports 5-8 as Untagged. Hit apply.
Port 1 needs to be a member of both VLANs, and it will be receiving tagged packages from the router (from the router to the switch). To make your switch know what to do with traffic coming into ports 2-8 (from servers to the switch), we need to configure PVID on the next screen.

Navigate to "VLAN" > "802.1Q PVID". Let port one go to PVID 1. Ports 2-4 need to go to PVID 10, Ports 5-8 need to go to PVID 20.
Getting an IP on the right VLAN.
Connect igb2 (third port, next to LAN port on Pfsense) to port 1 of your smart switch, and turn it on connecting it to a power socket. If you didn't try rebooting everything (Pfsense included), it won't hurt you. Connect a laptop to one of the ports of your switch. If you connect to ports 2-4, you should get an IP inside the DHCP range that you defined for OTP1, so something in 10.120.10.x. If you connect the laptop to ports 5-8, you should get an IP in the range of 10.120.20.x. You should not be able to talk to anything on the other VLAN.
8 - How to troubleshoot some problems

While testing the tagging setup I went through from different configurations not understanding what was happening and why it was not working, multiple times, when it should. Tried tcpkilling stuff, forcing dhclient to reload stuff, or anything like that, but in the end the good'ol pressing the power buttons and waiting for it to come back was the problem solver.
You can, of course, use all the well known commands to debug each of the network layers, from my tweet:
- NIC layer:
ip -br link show- "Machine" layer:
ip neighbor show- "IP" layer:
ip -br address show
ping http://example.com
traceroute http://example.com
ip route show- "Socket" or "IP:Port" layer:
ss -putan
telnet 10.0.0.1 443
nc 10.0.0.2 -u 80
You can also use Package Capture in Pfsense. Navigate to "Diagnostics" > "Packet Capture", Choose OPT1 (or 2) in the interface dropdown, and leave the rest as is (or change something, if you want something specific). Press Start. Start messing around in a laptop connected to an interesting port in the switch, pinging, tracerouting, or anything that you want. Press stop on Pfsense, and you can check all the logs. This is basically a frontend for tcpdump.
Another utility from Pfsense that you might want to check to understand what is happening in case of trouble following this guid is the Firewall system logs. Navigate to "Status" > "System Logs", and there choose the Firewall tab. You can check any role being enforced and packages that are being dropped. Maybe you forgot to allow something.
9 - Wifi AP
Your network is pretty much setup to be usable up to this point. But you might have noticed that we did not configure any wifi connection so far. By the way, please disable wifi in your ISP modem, if you did not do it already, you don't want it there.
If you have Desktop PCs and laptops that would be connected via cable to your network, just plug them in any of the 5-8 ports of your switch already. But for your wifi devices we need to setup an Access Point. For this example lets setup an Unifi Nanohd from Ubiquiti (You can literally use any other wifi AP, any that serves your needs).
Setting up the AP
Go to https://www.ui.com/download/unifi/unifi-nanohd and download the UniFi Network Application for your operating system. Install this software to your laptop. Connect you laptop to VLAN 20 while also connecting UniFi Nanohd to that VLAN (Let's say port 8 and port 7). Fire up the software and let it find the AP. Setup SSID password, and anything that you want, and that's it, you have wifi.
10 - Restrictive rules
Under construction! :)
11 - Suricata IDS/IPS
Under construction! :)
12 - Further improvements
Under construction! :)