
Previous part: https://knela.dev/homeprivatecloud
Private Cloud Remote access, IAC and configs
As we listed before, we will cover the follwing topics here:
- Configure OpenVPN to have remote access to our setup
- See how to use Opennebula custom provider to create VMs with IaC
- Bring up k3s minimal Kubernetes in your VMs with ansible
- Deploy a simple workload
- Configure Nginx as a forward proxy with ssl spread to get Public IP traffic into a VM
- Port forward your setup and make a service reachable
- Setup ddclient service to update our Domain even if we don't have a static IP
Table of contents
- 1 - OpenVPN config
- 2 - Terraforming Opennebula
- 3 - Ansible k3s cluster
- 4 - Deploy something
- 5 - Nginx as forward proxy
- 6 - Port forward to your service
- 7 - DNS client setup
- 8 - Ingress setup
- 9 - Final remarks
1 - OpenVPN config
Be very carefull with this step. Avoid doing it if you don't need remote access or if it would be infrequent. Try to isolate the network where VPN clients will jump in. Do this part at your own risk, and never share VPN client cert files with people that should not have them.
For the sake of simplicity I like to use the Road Warrior VPN script provided at Nyr/openvpn-install. Please do not use it blindly and read the code before running it. If you are not familiar with shell/bash scripts, ask someone that you know to review it. After doing that, we can download and run it:
$ wget https://raw.githubusercontent.com/Nyr/openvpn-install/master/openvpn-install.sh
$ chmod a+x openvpn-install.sh
$ sudo ./openvpn-install.sh
You can choose most of the default options, but for the port, choose something different. In some cases the VPN port will be by default blocked in your router/modem, so you can choose a different one here and take note of it to portforward later. Choose any DNS resolvers of your preference. If you are not sure which to chosse, go with 1.1.1.1. The final field will ask you for the first client name, and you can choose whatever you like.
Before we can start a VPN connection we need to portforward a port on the modem/router to your port on the Server. To do that first find the IP of your gateway in the Server on the wifi or cabled interface (whichever gives you internet). If you followed the Home private network guide, this will of course be different. And you would need to port forward on both your modem and your Pfsense router. If you did not follow that guide yet, you can just go forward here.
$ ip route | grep defaultAccess this in your Browser and look for a manual online on how to port forward the router port to your server port (For example, if you use Sagecom Forward Ports on the Sagemcom 3764 Router).
The first client vpn config file is place in /root/chosen_name.ovpn in your Server. Just cat it, copy its contents, exit the server connection, and paste it into a new file in you Personal Machine.
Install openvpn in your Personal Machine:
$ sudo apt install openvpnWith that out of the way, we can test our VPN connection. While not on your home network (mobile data, or really at a friends place), use openvpn with the config file that we created before on you Personal Machine:
sudo openvpn --config chosen_name.ovpnWhen it says Succeeded, try to ping your Server, and try to ping your VMs. Everything should be reachable. If you cannot reach your opennebula VMs from your Personal Machine, it is not a big deal, since we are going to configure the host server as a bastion hop in a bit. You should, of course, be able to reach your Host Server and ssh to it now, while on VPN. If you can't, you need to debug it.
If you have trouble with DNS resolutions and internet, edit /etc/resolv.conf on your Personal Machine and add as the first line nameserver 8.8.8.8 (or nameserver 1.1.1.1). Another problem might be the redirect-gateway directive that comes from this Road Warrior script. Search for redirect-gateway on your server, at /etc/openvpn/server/server.conf and delete that line (of course, restart the openvpn server sudo systemctl restart openvpn-server@server.service).
If you need a new client file to hand out to someone working in a project in you shared server, simply go to the server and run the Road Warrior OpenVPN script again. It will generate another client configuration file with different certificates for you to hand over to a VERY trusted person.
To monitor connections to your cluster you can egrep for "VPN" and "Data Channel" on your server's /var/log/syslog.
$ sudo egrep "VPN" /var/log/syslog
Dec 1 17:38:41 yourhost systemd[1]: Stopped OpenVPN service.
Dec 1 17:38:41 yourhost systemd[1]: Stopping OpenVPN service...
Dec 1 17:38:41 yourhost systemd[1]: Starting OpenVPN service...
Dec 1 17:38:41 yourhost systemd[1]: Finished OpenVPN service.
$ sudo egrep "Data Channel" /var/log/syslog
Dec 19 17:37:19 yourhost openvpn[1629]: EXTERNALIP:PORT Data Channel MTU parms [ L:XXXX D:XXXX EF:XXX EB:XXX ET:X EL:X ]
Dec 19 17:37:20 yourhost openvpn[1629]: personal_host/EXTERNALIP:PORT Data Channel: using negotiated cipher 'XXXXXXX'
Dec 19 17:37:20 yourhost openvpn[1629]: personal_host/EXTERNALIP:PORT Data Channel MTU parms [ L:XXX D:XXX EF:XX EB:XXX ET:X EL:X ]
Dec 19 17:37:20 yourhost openvpn[1629]: personal_host/EXTERNALIP:PORT Outgoing Data Channel: Cipher 'XXXXXXX' initialized with XXX bit key
Dec 19 17:37:20 yourhost openvpn[1629]: personal_host/EXTERNALIP:PORT Incoming Data Channel: Cipher 'XXXXXXX' initialized with XXX bit key2 - Terraforming Opennebula
Opennebula is not the biggest hit when you look for terraform providers. There were a few, made by individual contributors, but now you can find one provider in their official repository. It is still in early stages, but it is actively maintained, and it works well.
Requirements for running terraform on our opennebula
Let's list some assumptions here to start:
- You are going to need a bit of terraform knowledge here, but just to understand what we have written already, and how to change it.
- You need terraform (1.1.4) and ansible (2.12) installed.
- You need to have gone through all the steps from the previous guide, where we added some images and had a Virtual Network created on Opennebula.
- You need to create a user with enough rights for terraform to use.
- You of course need to be with your VPN connected or have your Server reachable somehow.
Before starting, you can find the markdown code that generates this post and all the other relevant code at knelasevero/home-server-infra. Please clone the repo and have it handy.
Let's avoid using IPs
If you are using Pfsense, and you are also using it to resolve your LAN DNS (from the private network guide that I mentioned before), you can already create an entry in it for your Server. If you are not, simply add some entries in your /etc/hosts file:
sudo echo "IP_OF_YOUR_SERVER homeinfra" >> /etc/hosts
sudo echo "IP_OF_YOUR_SERVER opnb.homeinfra" >> /etc/hosts
## This last one will be useful when we create a ssh tunel later in the guide
sudo echo "127.0.0.1 control.opnb.homeinfra" >> /etc/hosts
Configuring ssh hop with ssh config
There is a file in the repository that you can use to configure your ssh to set your Server as the bastion to ssh into your created VMs. We use a ProxyCommand to ssh from your Personal Machine to a created VM, hopping first to your Server. Here is the config.cfg file contents:
Host opnb.homeinfra
  Hostname opnb.homeinfra
  Port 22
  User YOURUSER

Host control.opnb.homeinfra
  Hostname 192.168.122.2
  User root
  ProxyCommand ssh opnb.homeinfra -W %h:%p

Host node1.opnb.homeinfra
  Hostname 192.168.122.3
  User root
  ProxyCommand ssh opnb.homeinfra -W %h:%p

Host node2.opnb.homeinfra
  Hostname 192.168.122.4
  User root
  ProxyCommand ssh opnb.homeinfra -W %h:%p
If you are login into the Server with another user, different from the user that you have on your Personal Machine, you have to set it there for the opnb.homeinfra connection. To use it natively, simply copy it to the .ssh folder:
cp ansible_kes/config.cfg ~/.ssh/config
chmod 600 ~/.ssh/config
With the file at the right place, you can now already use it to ssh to your server using it:
ssh opnb.homeinfraWalkthrough the Terraform code
If you cloned the repo you will notice that we have a terraform folder there. Inside it we have a very basic structure. A modules folder, where we only have a module defining how to create a Opennebula VM instance, and our main.tf entrypoint calling that module.
We also have our variables.tf files both for the main entrypoint and for the module. Some variables are being overwritten from above, and some are left as null on purpose, so we can pass them as environment variables or as inputs in the terminal.
Please change main.tf to what makes sense to you, but right now it tries to create the following VMs on Opennebula:
Control Plane node:
cpu = 2
  vcpu = 2
  memory = 7168 (7GB)
  ip = "192.168.122.2"
Follower node1:
cpu = 1
  vcpu = 1
  memory = 4096 (4GB)
  ip = "192.168.122.3"
Follower node2:
cpu = 1
  vcpu = 1
  memory = 4096 (4GB)
  ip = "192.168.122.4"
We are fixing these IPs to make it easier to make them see themselves and when we add Kubernetes to them, to make it easy for them to know who is the control plane node. Before applying this terraform code, you want to do some preparation first.
Open variables.tf, and add you ssh public key where you can see mine. Since you also added opnb.homeinfra entry to your dns resolution file (or server), you should be fine regarding that. If you did not, you should add the IP of your server on those places mentioning opnb.homeinfra.
Since you enabled MFA for your user, you cant use it here for terraform to apply resources. You will have to create another user on Opennebula that does not have MFA enabled. Be careful with that user, and don't share its credentials.
While inside the terraform folder, run terraform init to download providers and do the initial setup:
terraform init -upgradeNow you can decide if you want terraform to ask you for Opennebula creds every time or if you want to export them to be able to apply or destroy terraform without it asking you for them. If you want to export them, just do it like this:
export TF_VAR_one_username=NAME_OF_THE_USER_THAT_YOU_CREATED_FOR_THIS
export TF_VAR_one_password=THIS_USER'S_PASSWORD
With that out of the way, you can apply terraform (type yes when it asks you):
terraform applyAnd when it is done, you should have VMs created in your Opennebula web console.
3 - Ansible k3s cluster
Before running ansible
We first need to check our ssh config for hops to later use with ansible. Let's try that. Based on our previous config, we should be able to ssh into ansible without any intermediary steps:
ssh control.opnb.homeinfra

and

ssh node1.opnb.homeinfra

and

ssh node2.opnb.homeinfra
If you already tried that, but destroyed the VMs a few times, ssh will complain that the MAC address of the machine is different from before, but has the same IP. Simply run ssh-keygen -f "~/.ssh/known_hosts" -R "192.168.122.x" changing x for each of the IPs that you had before. You actually need to ssh first to those machines at least one time to make them part of your known hosts.
"Our" k3s ansible code
To bring up k3s in our cluster we just copied the role created by itwars, that is available at k3s-io/k3s-ansible. We had to do some tweaks to be able to make ansible able to do the same ssh hops that we can do.
You can check them out at ansible_k3s/inventory/dev-cluster/hosts.ini. We make ansible use our ssh key and also let it know that it will have to ProxyCommand another ssh call to hop into the VMs in Opennebula.
With that out of the way you can run ansible, let it install k3s and make all nodes join in a cluster:
./scripts/run_k3s_ansible.shIf you want to check if everything is OK, jump to your control plane node and see if the nodes are healthy:
ssh control.opnb.homeinfra

kubectl get nodes
# Output
NAME                     STATUS   ROLES                  AGE   VERSION
control.opnb.homeinfra   Ready    control-plane,master   69m   v1.22.3+k3s1
node1.opnb.homeinfra     Ready    <none>                 68m   v1.22.3+k3s1
node2.opnb.homeinfra     Ready    <none>                 68m   v1.22.3+k3s1
You should get output similar to the above. You can also make an ssh tunnel to your machine.
In another terminal run:
ssh -L 6443:192.168.122.2:6443 IP_OF_SERVERThen on you Personal Machine run:
kubectl get nodesYou should get the same output.
I want to stress it here that if you don't want to deal with kubernetes, (and you probably don't want it for small scale stuff) specially if you don't have the expertise (and don't want to learn), feel free to skip anything kubernetes related.
If you want to remove k3s from all nodes, simply run ./scripts/reset_k3s_ansible.sh.
4 - Deploy something
Let's deploy something just to later expose it and show how to let the service be publicly available in the internet. Apply this simple deployment with a example guestbook application (You will need kubectl installed):
kubectl apply -f https://k8s.io/examples/application/guestbook/redis-leader-deployment.yaml
kubectl apply -f https://k8s.io/examples/application/guestbook/redis-leader-service.yaml
kubectl apply -f https://k8s.io/examples/application/guestbook/redis-follower-deployment.yaml
kubectl apply -f https://k8s.io/examples/application/guestbook/redis-follower-service.yaml
kubectl apply -f https://k8s.io/examples/application/guestbook/frontend-deployment.yaml
kubectl apply -f https://k8s.io/examples/application/guestbook/frontend-service.yaml
Check to see if pods are up:
kubectl get pods

NAME                             READY   STATUS    RESTARTS   AGE
redis-leader-fb76b4755-vgb5p     1/1     Running   0          10m
redis-follower-dddfbdcc9-dlwj8   1/1     Running   0          7m51s
redis-follower-dddfbdcc9-5jmvc   1/1     Running   0          7m51s
frontend-85595f5bf9-mns9n        1/1     Running   0          7m
You should get output similar to the one above.
5 - Nginx as forward proxy
You are going to need a way to forward traffic that is coming on the host Server to the VMs. But in our case, we also want to let all ssl connections be handled by things happening inside kubernetes, so we let cert-manager handle renovating certs and all. To make that possible, instead of using nginx as a reverse proxy, as it usually is, we can use it as a "normal" forward proxy, with ssl spread, so everything is handled in our Kubernetes pods.
Configuring nginx stream forward proxy
If you ran the ansible playbook to prepare the Opennebula Server with the all tag, it already ran the role named proxy and this is already configured. Basically we just need to add this block to /etc/nginx/nginx.conf (if it is not there already):
stream {
    server {
        listen 80;
        proxy_pass 192.168.122.3:80;
   }
   server {
       listen 443;
       ssl_preread on;
       proxy_connect_timeout 5s;
       proxy_pass 192.168.122.3:443;
   }
}
This is forwarding all traffic hitting port 80/443 of your Server to port 80/443 of your node1 VM (For 443 it is also spreading ssl, so certs from ingresses inside the cluster are used).
6 - Port forward to your service
This will depend on your current setup. If everything is connected directly to your ISP's modem, you will need to just port forward it there. Look for your ISP's modem model manual, and see how to port forward from a port on it to a port on your Server. If you followed the Home private network guide, you will have to do that on both your ISP's modem and on your PFsense router/firewall. If you need help with this, don't hesitate to ping me on twitter or anywhere.
7 - DNS client setup
If you are already paying for a static IP from your ISP, you can just point a subdomain to your home IP and be done with this part. But if you don't, and you are not planing on doing that yet, ddclient can be a nice option to you.
This part is not yet implemented in my ansible setup, since it can vary a lot depending on the provider that you are using to host your domain. You need to create a dynamic dns entry on your DNS provider, get the credentials to change it remotely, and pass the configurations to ddclient in a configuration file located at /etc/ddclient.conf. You, of course, also need to install ddclient and enable its systemd service to let it always keep your subdomain updated with your latest public IP.
To install and enable it:
sudo apt install ddclient
sudo systemctl start ddclient
sudo systemctl enable ddclient
To configure it edit the file /etc/ddclient.conf:
ssl=yes
## You can change the "source of MYIP" here
use=web, web=myip.dnsomatic.com
## set the protocol to your provider
protocol=YOURPROVIDER,
daemon=30
login=USERNAME
password='PASSWORD'
## type your domain bellow
guest.home.domain.com
After ddclient is running and updating your subdomain, check that it is working. First check your ip:
curl myip.dnsomatic.comThen check that your domain is pointing to you:
nslookup guest.home.domain.com8 - Ingress setup
Let's first install cert-manager to handle our ssl certificates (You will need kubectl installed):
kubectl apply -f https://github.com/cert-manager/cert-manager/releases/download/v1.7.1/cert-manager.yamlWe have some files prepared on the k8s-ingress folder. Let's have a look and apply them. The first file is our letsencrypt certificate issuer. You don't need to change anything on it, just apply it. The second file will apply some changes in the Guestbook example service that we deployed before, to make it serve on another service port. You also just apply it. The last file (ingress-rules.yaml) will create an Ingress resource defining some simple rules. Kubernetes will use traefik Ingress Controller since we deployed k3s with it by default (you don't really need to worry about that). You will need to change those lines mentioning the Ingress domain to the domain that you already have pointed to your IP. Beware that applying this with wrong configurations could hammer letsencrypt with invalid calls and they can ban you for a while, so be sure that your sub domain is pointed at your IP and that port 80 and 443 is reachable and port fowarded from your modem (maybe your possible Pfsense router, if you followed Home private network) to your server.
sed -i "s/guest.home.domain.com/YOUR_DOMAIN/g" k8s-ingress/ingress-rules.yaml
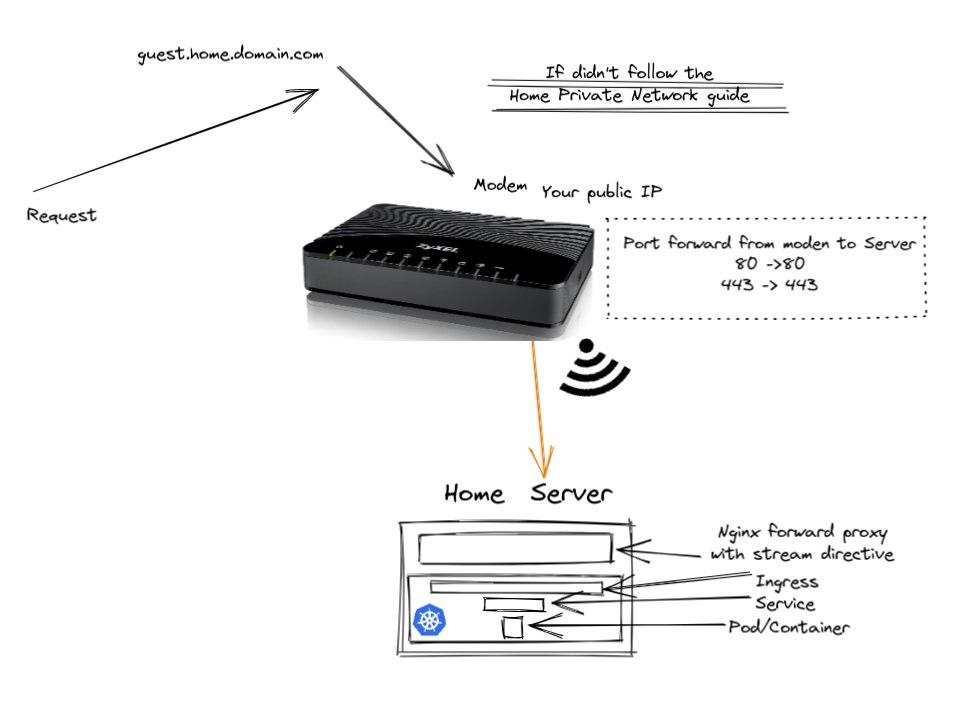
kubectl apply -f k8s-ingress/If you did not follow the Home private network guide, this is basically what is happening:
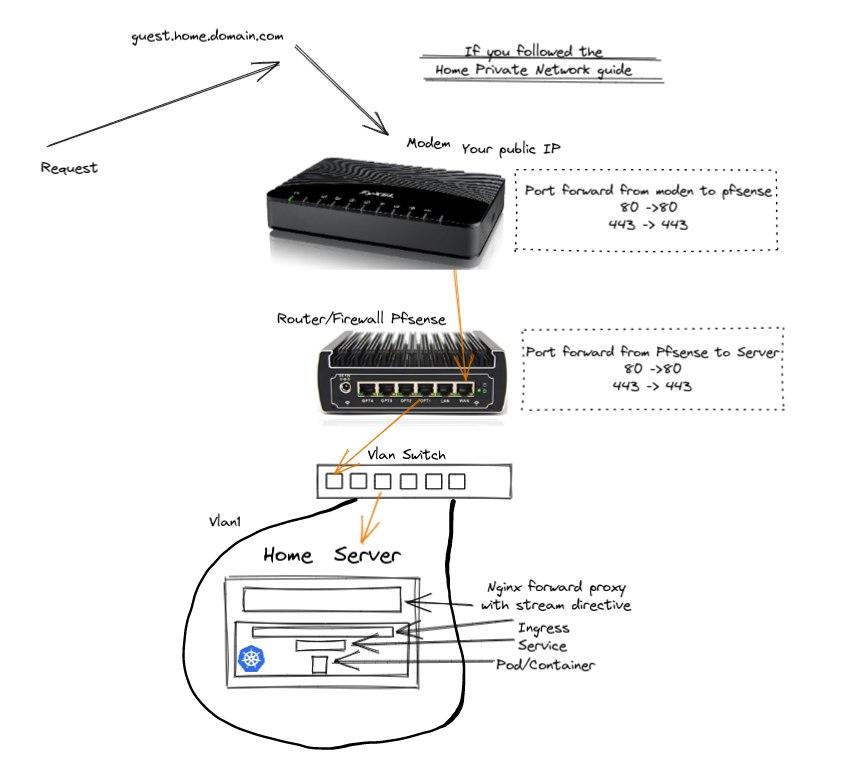
If you followed the Home private network guide, this is basically what is happening:
9 - Final remarks
As you noticed, to get this setup to be a bit more interesting, you would have to go through the Home private network first. But since that guide requires you to buy some more hardware, I have written this one to be independent from the other one.
We are calling your server Spare Machine at some places, since we are assuming you don't want to initially commit to a full fledged Server hardware, made for that (hardware that is meant to be up 24/7). Maybe you want to test drive everything with an old laptop or some raspberry pis before committing to something more expensive. I recommend going through the Home private network anyways, if you plan to leave things open to the internet (specially VPN), since it is more secure, and you don't wanna risk things.
Feel free to reach out with questions and improvements to the guides. The text and code is available at knelasevero/home-server-infra.